Sunday, March 6, 2011

Oreo Stuffed Chocolate Chip Cookies


Cookies are my favorite, and chocolate chip cookies are my ultimate favorite. Seriously, you can ask most anyone I know that I will always opt for a chocolate chip cookie over any other when given a choice. I'm not sure what it is about them that make them so good, is it the cookie part or the chocolate chip part? I think it must be a combination of the both, with that said I couldn't think of a better way to add to that amazing combination than to add one of America's favorite cookies - the Oreo. Oreo's are by far the best cookie to dip in milk. (It is a mandatory to eat these cookies with a tall glass of cold milk) I came across this recipe after once again reading one of my favorite blogs Lovin from the Oven. This is a cookie within a cookie, or maybe I should call them 3 cookies in one cookie. Super easy, and sooo good. Enjoy!

Recipe adapted from Lovin from the Oven.
  • 2 sticks of softened butter
  • 3/4 cup packed brown sugar
  • 1 cup white sugar
  • 2 large eggs
  • 1 tablespoon vanilla extract
  • 3 cups all-purpose flour
  • 1 teaspoon salt
  • 1 teaspoon baking soda
  • 10 oz semi-sweet chocolate chips
  • 1 package Oreo cookies
  1. Cream together the butter and sugars. Add in the eggs and vanilla and mix until well combined.
  2. In a separate bowl, mix the flour,baking soda, and salt.
  3. Slowly add the dry mix tothe we mixture until just combined. Stir in the chocolate chips.
  4. Wrap the dough in plastic wrap and place in the fridge for at least an hour to rest.
  5. Preheat the oven to 350 degrees.
  6. Scoop a ball of cookie dough on top of the Orean and another below, sandwiching the Oreo in between. Flatten the cookie dough and seal the edges, completely covering the Oreo.
  7. Place the cookies at least 2 inches apart on a baking sheet covered in parchment. Bake for 8-13 minutes.

Wednesday, February 16, 2011

My moms cookie cutters


Over the holidays I went back to Savannah to visit my mom and family. As most families do over the holidays - we baked. I had it in my head that I wanted to make Linzer Cookies, which are traditional Austrian cookies that I love. They're two cookies placed on top of each other with raspberry or strawberry jam in the center and a hole cut out of the top one dusted with confectioners sugar... so good. So in order to make these I needed some round cookie cutters and then smaller round cutters for the hole in the top cookie. I asked my mom where her cookie cutters were and I was happy to see that she had quite the collection. I am the youngest of 4 children and my mom was quite the baker when we were growing up (and still is) we have home video's of us decorating cookies at almost every holiday made with these very cookie cutters. Getting them all out brought back a lot of memories and I thought I would share her expansive collection with all of you.

Monday, January 24, 2011

Garfield Cupcakes

Looking good Garfield

All the eyes, ears, and mouths before they went on the cupcake tops

before the faces went on

I felt like they were watching me!
Do you think they knew they were going to be eaten?

Long time no blog! I know I have been terrible. I hope that you all can forgive me, I have been traveling once again for work and with that and the holidays things just got away from me. The good news is that I have been baking I just haven't been blogging so we have lots to catch up on.

Starting today with Garfield cupcakes! I was asked to make these for a little boys birthday this weekend which I thought was so fun. The mom sent me some pictures of other Garfield cupcakes and I gravitated toward the version that Bakerella had created. The only issue is that the adorable faces are all made out of fondant... uh oh. I have a pretty strict policy about not making things just to look good but they also have to taste good and fondant goes against that policy in a big way. However, after much back and forth I realized I couldn't get the level of detail I wanted to achieve with anything other than fondant so I decided to give it a go. I also figured that these were for kids and kids tend to not be bothered by the sugary taste of fondant since kids love anything sweet. So I decided to go with it, I promised myself that the cupcake itself and the buttercream under the fondant would be amazing to make up for the use of the fondant on top.

This was my first time ever using fondant so lets just say I was a little nervous but honestly once you get used to working with the texture it really can be pretty fun.You might be wondering how I pulled this off. My answer would be with a lot of planning.

First I created a template on the computer in Illustrator (if you don't have illustrator you can always draw it out by hand) I made the pieces of his face how I thought they should be, so two oval eyes, two eye lids, and a cute curled up mouth. The ears and nose I created just with my eye. I then printed the paper out - cut each shape, and traced those on to a thicker piece of card stock. I then cut out the pieces of card stock and used them as stencils when I was cutting out my fondant. I know this sounds like a lot to do but it only takes a few min and is worth the time. This way each cupcake looked the same and I could breeze right through all the fondant cuts.

For the fondant I used plain white fondant that you can find at any craft store in the baking section or at a baking supply store. To get the colors right to match the true Garfield I recommend using Wilton's gel coloring so that you don't water down the fondant. The colors are also much more vibrant - here is a link to Wiltons color chart, very helpful.

Once I had all my pieces cut out I dabbed a little water on each piece to get them to stick to the fondant rounds on each cupcake. One thing I did learn is that fondant dries quickly! So you kinda have to work fast. I used edible ink pens for the eyes and details on the edge.

Now I feel confident enough to try and take on any fun character only next time I think I will dry my fondant round out for a few hours and place them on top of the decorated cupcakes so that people can easily remove them if they prefer not to eat the fondant. I hope Jim Davis would be proud.

Tuesday, December 14, 2010

Harriot Grace


On any given day I probably look at about 500 websites, and at least that many emails pumped with stock shots from photographers. Since I am so over stimulated by imagery - good and bad, it's always fun when something really catches my eye.

A few months ago I came across Harriot Grace, a small humble online retailer out of Canada. I was originally drawn to them for their cake flags, but I quickly fell in love with everything else they had on their site. Not only do they have beautiful items but they have a great story. As the website states, it is a father daughter business, only this father and daughter live almost 3,000 miles apart from each other. It all started when the father started sending packages of handmade wooden spoons to his daughter which she fell in love with so she asked her father if he would like to share them with the world, after much thought he agreed and the rest is online history! Each item is lovingly handcrafted and one of a kind. They often sell out but replenish every few months. I hope you enjoy them as much as I do. Happy shopping.

Sunday, November 28, 2010

Raspberry Thumbprints

1 inch balls spaced 3 inches apart... they do spread during the baking process.

Wet your thumb when making thumbprints to keep your finger from sticking.

So Thanksgiving is all wrapped up, literally... I think I have enough left overs to last till Christmas. The great thing about Thanksgiving being over with is that now we have a excuse to make tons of cookies and Christmas treats for everyone we know. To get in the holiday spirit while I was in an airport the other day and picked up the current Martha Stewart's Holiday Cookies issue. 101 recipes for every holiday cookie under the sun. Issues like this are great because you can keep them forever and always refer back to them in times of need – like a cookbook only much less expensive.
My friends Steej came over yesterday to help decorate my Christmas tree. It was beautiful out and the perfect Saturday for Christmas decorating, Steej had the great idea to bake some cookies while we decorate... great idea! My first thought was to bake linzer cookies since I have been dying to try them out but I didn't have any almonds or hazelnuts so I decided to sift through the Holiday Cookie issue and landed on Raspberry Thumbprints which looked to be incredibly simple based on the recipe. The dough is very easily thrown together on the fly but it does take a little time to roll each ball and fill with the raspberry jam. With that said they were well worth it. I love raspberry jam so I always have it handy and I think the red color make them perfect for Christmas. They aren't overly sweet which makes them great for a middle of the day treat. I had one this morning with my coffee and I'm not complaining.

Original recipe from Martha Stewart's 2010 Holiday Cookie issue

Ingredients:
  • 1 1/2 cups (3 sticks) of butter
  • 1 cup sugar
  • 1 large egg
  • 3 1/4 cups all-purpose flour
  • 3/4 cup of raspberry jam
  1. Preheat oven to 350 degrees. In the work bowl of a mixer fitted with the paddle attachment beat the butter and sugar on medium speed until pale and fluffy. 3-4 minutes. Add egg and beat until completely combined. Reduce speed to low, add flour and mix until incorporated.
  2. Shape dough into 1-inch balls. Place on parchment lined baking sheets spacing at least 3 inches apart.
  3. Moisten thumb with water, and gently press center of each ball to make and indentation. heat jam in a small saucepan over medium heat until melted. Spoon about 1/2 teaspoon into each indentation. Bake rotating sheet halfway through, until cookies are golden brown around the edges about 15 min - make sure not to over bake. Transfer to a wire rack and let cool completely. Store extra's in an airtight container for up to 2 days.

Sunday, November 14, 2010

Mini Pumpkin Whoopie Pie's

Jose Tellez down in CBN took this photo for me, I think it came out really great. All of mine are super green from the lighting in the room. I promise my next post will have better photos :-)

In addition to my mini pumpkin cheesecakes that I made for our office Chili cook-off I also made some mini pumpkin whoopie pies. If you read my blog often you will find I love to make whoopie pies. I just think they are fun, super easy, and taste great. Since it is the season of pumpkin and I had already made pumpkin cheesecakes I thought I would stick with the theme and go with pumpkin whoopies, I mean what isn't to like? Pumpkin as an ingredient makes for some really moist and flavorful desserts - everyone loved them and they were the perfect size to just pop in our mouth. These would be awesome for kids on Thanksgiving, they are so good they might even want to help you make them.

Pumpkin Whoopies:
  • 2 1/4 cups all purpose flour
  • 1 tsp baking powder
  • 1/2 tsp baking soda
  • 1 tblsp ground cinnamon
  • 1 1/2 tsp ground ginger
  • 1 tsp ground allspice
  • 1 tsp ground nutmeg
  • 1/2 tsp salt
  • 1 cup brown sugar
  • 1/2 cup unsalted butter, at room temperature
  • 1 1/2 cups solid pack pumpkin
  • 1 egg
  • 1 tsp vanilla extract
  1. Preheat oven to 350, line two making sheets with parchment paper and set aside.
  2. Sift together the flour, baking powder, baking soda, cinnamon, ginger, allspice, nutmeg, and salt into a bowl or piece of waxed paper.
  3. In the work bowl of a stand mixer fitted with the paddle attachment, beat together the brown sugar and butter on low speed until just combined. Add in the pumkin, then the egg, beating well. Add the vanilla and beat until combined.
  4. Slowly add the flour mixture and beat on low until incorporated, scraping down the sides of the bowl as you go.
  5. Using a small ice-cream scoop or a pastry bag or really anything you choose... make small rounds of the batter as small or large as you like. I made mini ones so I used my eye to make them all roughly the same size and by using a large round tip on the end of my pastry bag. Make sure to space them at least two inches apart from each other.
  6. Bake one sheet at a time for about 12-15 minutes each, or until the cakes begin to crack and are firm to the touch (this will also change depending on how small are large you make them). Let the cakes cool completely before icing them.
Maple Cream Cheese Frosting:
  • 3 cups powdered sugar
  • 1/2 cup unsalted butter, at room temperature
  • 8 ounces cream cheese at room temperature
  • 1 tbsp maple syrup
  • 1 tsp vanilla extract
  1. In the bowl of a stand mixer fitted with a paddle attachment, beat the butter until smooth,
  2. Add the cream cheese and beat until combined.
  3. Slowly add the powdered sugar, maples syrup and vanilla until smooth.

To assemble:
  1. Flip over half of the completely cooled whoopies so the flat side is facing up.
  2. Pipe enough to cover the whoopie 1 1/2 tsp - 1 tblsp of icing depending on how large the whoopies are.
  3. Place another whoopie flat side down on top and press down lightly. If your icing gets too soft you can always put it in the fridge before hand to firm it up a bit. These are best served at room temperature. Store left overs in an airtight container. Enjoy!

Saturday, November 6, 2010

Mini Pumpkin Cheesecakes


Cheesecake mixture

Graham cracker mixture

Making their big debut at the TRG chili cook-off

Each year at work the re-touching department at The Richards Group which is referred to as CBN has a "Chili Cook-Off" you can enter your homemade chili or you can bring a dessert or side of your choice. There is a panel of judges that judge each chili and name a winner each year. It is a lot of fun and people really get into it which makes it an event to look forward to each year.
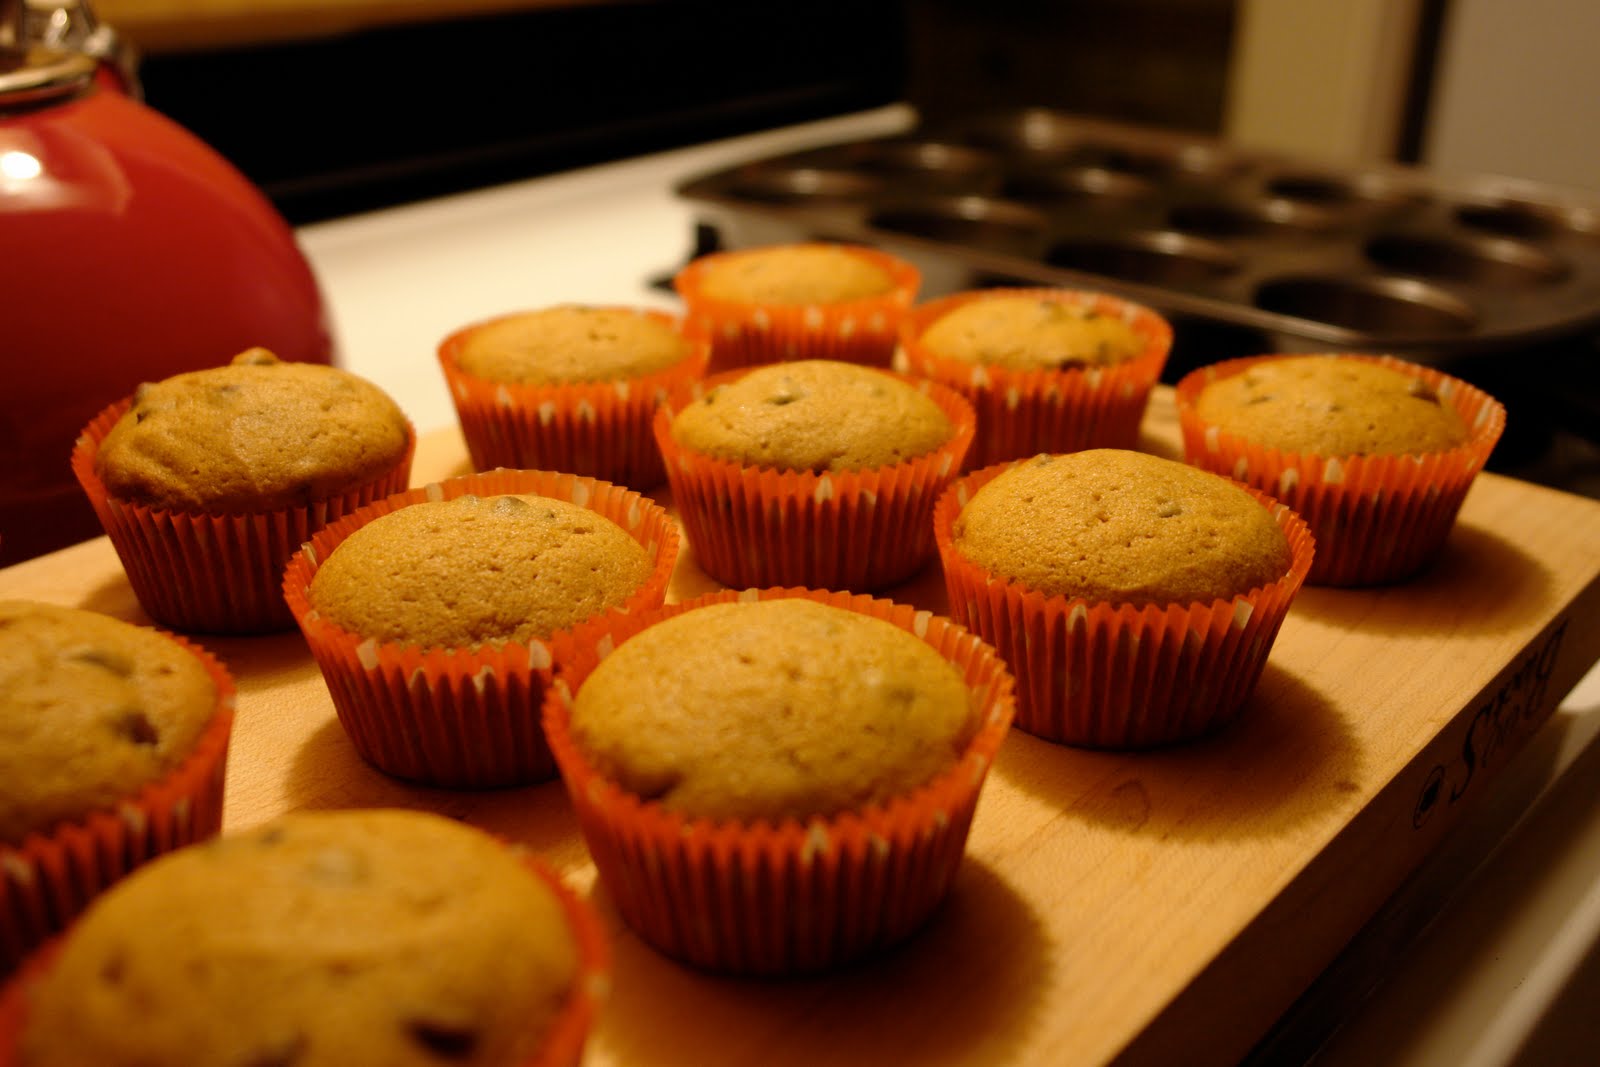
I thought about making chili this year but who was I kidding, dessert is my thing so I am sticking to it. As I mentioned in the last post, pumpkin is my favorite fall ingredient so I decided to not just highlight it in one dessert, but two. The first one was a mini pumpkin cheesecake recipe that I found while surfing the wonderful world of baking blogs. I had thought about making a large pumpkin cheesecake so when I found these I was thrilled. They were a huge hit at the cook-off. I think people really enjoy the small cupcake size since it is easier to handle then a full piece of cake. Not to mention the taste is out of this world. The only down side to this recipe is that you have to keep them in the fridge overnight before you can enjoy them :-)

Check back in a few days and I will post the second pumpkin dessert - mini pumpkin whoopie pies with maple cream cheese frosting - yummy

Original recipe adapted from Gingerbread Bagels (she has lots of great photos of the process and I suggest you check them out)

***NOTE: CHANGE IN RECIPE*** My Mom tried making these today and informed me that the amount of cheesecake batter the recipe makes is only enough for about 10 cupcakes... After thinking back on the day I made these I doubled the cheesecake portion of the recipe, so I didn't notice at the time. However, the amount of pumpkin mixture is plenty if you are doubling the cheesecake. So, if you need more than 10 servings I would go ahead and double the cheesecake portion of the recipe. Hope this helps! - K

Crust:
  • 7 graham cracker sheets
  • 1/2 tsp ground cinnamon
  • 2 tablespoons sugar
  • 4 tablespoons unsalted butter, melted

Cheesecake mixture:
  • 1 pound cream cheese, softened (two 8 ounce blocks)
  • 2/3 cup sugar
  • 2 teaspoons vanilla extract
  • 2 eggs, at room temperature lightly beaten
  • 1/2 cup sour cream

Pumpkin mixture:
  • 1/3 cup pumpkin puree
  • 1 tsp ground cinnamon
  • 1 teaspoon ground nutmeg
  • 1 1/2 tsp pumpkin pie spice
  • 2 tablespoons + 1/2 teaspoon all purpose flour
Directions:
  1. Preheat the oven to 300 degrees. Line your cupcake pan with liners, set aside.
  2. In a food processor, place the graham crackers and pulse till they are a sandlike texture. Place the graham cracker crumbs in a bowl, add 1/2 tsp of cinnamon and 2 tablespoons of sugar. Melt the butter and add to the graham cracker mixture. Put 1 tablespoon of the mixture into the bottom of each cupcake liner. Press down the crumbs with your finger and set aside.
  3. In a large mixing bowl fitted with the paddle attachment mix the cream cheese on medium speed for about 3 min until it is smooth without any lumps. Add in 2/3 cup of sugar and 2 tsp of vanilla extract. mix until just combined.
  4. in a separate bowl, crack the eggs and lightly beat. Slowly add in the eggs and mix. Add in the 1/2 cup of sour cream and mix until the cheesecake mixture is smooth, making sure to scrape down the sides as you go.
  5. To make the pumpkin mixture, combine all the ingredients listed above under "pumpkin mixture" add in 2/3 cup of the cheesecake mixture and mix until the two batters are completely combined and there are no lumps.
  6. Fill each cupcake liner with 1 1/2 scoop fulls of the cheesecake batter (using a small ice cream scoop) each liner should be filled almost to the top. Now place 3 dots of the pumpkin batter onto each of the batter filled liners. I used a 1/4 teaspoon to scoop the pumpkin in. Use a toothpick to swirl the two batters together.
  7. Bake in the oven for about 27-30 min. Rotate the pan half way through the baking time. Once they are done backing, cool them completely in the fridge overnight - Keep them in the pan
  8. ENJOY!
Here are some of my photos from the cook-off while the judging was going on before the masses of chili seekers hit...

Chocolate Chip Pumpkin Muffins


It's fall and in Texas that means somewhat normal temperatures. I believe that it's the best time of the year to live here, high's of 65 lows of 40... my favorite. To celebrate I have been baking anything with pumpkin since it is the ultimate fall ingredient. I am surprised my local grocery store hasn't run out yet since I have been buying a ridiculous amount. A few years ago a friend of my gave me this super simple recipe that is sure to cure a fall craving. These are great for a lazy Sunday with a big cup of coffee. I hope you enjoy them as much as I do.

Ingredients:
  • 1 2/3 cup flour
  • 1 cup sugar
  • 1 tbsp pumpkin pie spice
  • 1 tsp baking soda
  • 1/4 tsp baking powder
  • 1/4 tsp salt
  • 2 eggs
  • 1 cup of pumpkin
  • 1/2 cup melted butter
  • 2 cup semi-sweet chocolate chips (or a little more :-)
  • Cinnamon/Sugar mixture to sprinkle on top (optional)

  1. Preheat the oven to 350. Line a cupcake pan or muffin pan with your liners. I used cupcake pans for mine since I like them a little smaller.
  2. Mix the dry ingredients in a bowl and set aside.
  3. In a mixer fitted with the paddle attachment mix together pumpkin, eggs, and butter.
  4. Carefully add your dry ingredients and mix until well combined, don't over mix.
  5. Using a small ice cream scoop or a spoon, fill each cupcake liner up 3/4 of the way full. Bake for 20-25 min.
Related Posts with Thumbnails