Wednesday, June 30, 2010

4th Flag Cupcakes


4th of July is upon us and I thought we should celebrate with cupcakes! My original plan was to make a "flag cake" which in case you have never seen one it is two sheet cakes layered on top of each other usually with a whipped cream frosting and then you use either raspberries or strawberries to create the red stripes of the american flag and blueberries to make the stars. It is an adorable festive cake that I recommend you try one day if you haven't already. However, this year I wanted to make something a little more unique and I was in the mood to experiment so I drew out a cupcake that had all the colors of the American flag only in a deconstructed way so it wasn't as literal. These are easy but still special and look like a professional cupcake. If you want you can always make the cupcake part in advance along with the raspberry drizzle and assemble when you have a little time to spend doing them carefully. Happy 4th, enjoy!

Makes about 17 cupcakes

For the cupcakes:
  • 1 package of yellow cake mix
  • 3 eggs
  • 1/3 cup of oil
  • 1 1/3 cup of water
  • 1 package of fresh blueberries
  • 1 package of fresh raspberries
Whipped cream frosting and filling:
  • 4 cups of heavy whipping cream (might need to make this in two batches, it makes a lot)
  • 1/3 cup of sugar
  • 3 tsp of almond extract
Raspberry Drizzle:
  • 1 (12 oz) package of frozen raspberries thawed and drained, juice reserved
  • 1/4 cup of sugar
  • 2 tablespoons cornstarch
  • 2 tablespoons of raspberry liqueur (if you have it, don't worry if you don't)

Directions:
  1. Preheat you oven to 350 and center your rack.
  2. Mix the cake mix with eggs, water, and oil according to the back of the cake mix package.
  3. Line your cupcake tray with which ever color liners you like and fill 3/4 of the way to the top so that you get a little overlap once they bake making sure you have enough to cut off and use later for tops.
  4. Bake for about 15-18 min. Cool completely on a rack, once cooled carefully cut the top of each cupcake off using a serrated knife.
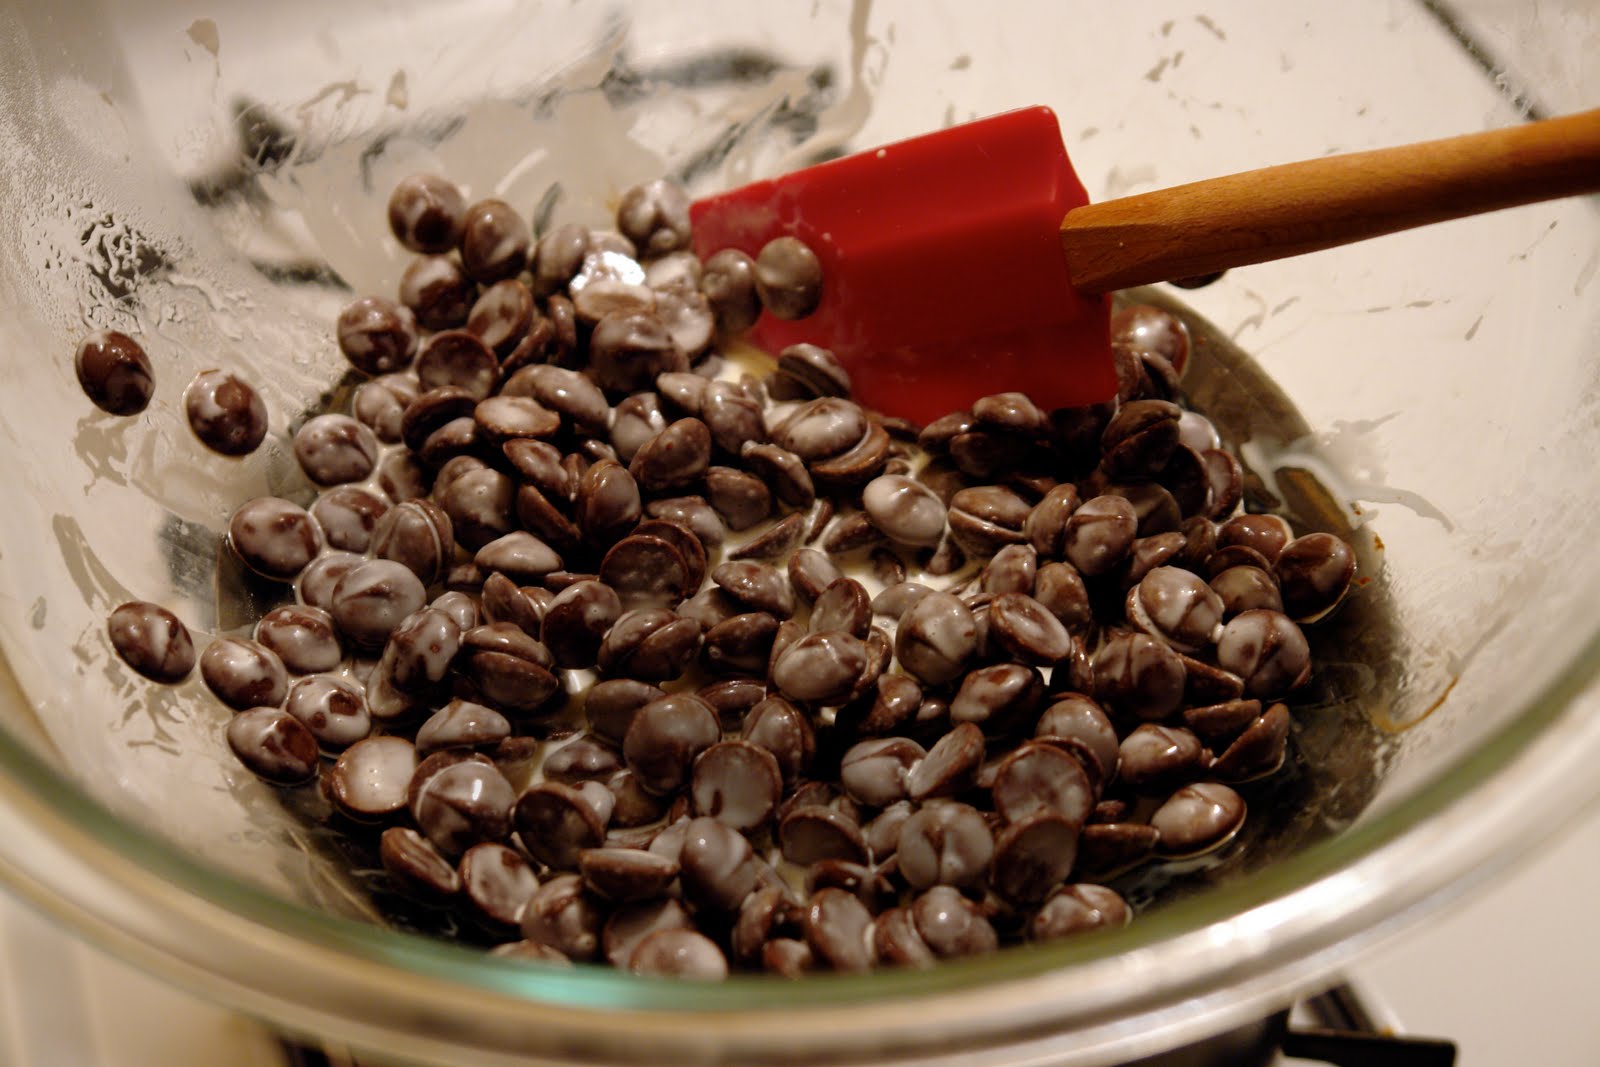
  5. While the cupcakes are cooling make your raspberry sauce. Add enough water to reserved raspberry juice to measure 1 cup (make sure you do this otherwise it will be way to thick in the end) Stir together sugar and cornstarch in a 1-quart saucepan. Stir in juice and raspberries.
  6. Heat to boiling over medium heat. Boil and stir 1 min; strain out the seeds and let cool completely, your done. If you want you can add the liqueur after you strain it.
  7. In a stand mixer fixed with the whisk attachment, whisk together your whipped cream ingredients - cream, sugar, and almond extract until stiff peaks form. About 2-3 min.
  8. In a pastry bag fitted with a small round tip fill with about a quarter of the whipped cream mixture and insert into the center of the cupcake bottoms to fill the centers with cream.
  9. In a larger pastry bag fitted with a large round tip put a layer of frosting on the top of the cut cupcakes. Place a small handful of blueberries on top of the cream layer on each cupcake.
  10. Put your cupcake tops back on top of the blueberry cream layer. Using the rest of the whipped cream frosting pipe a mound of whipped cream on top of it as high as you want, I feel for these they look best when there is a good amount of height to them, go all out :-)
  11. Drizzle with the raspberry sauce using just a spoon or you can put it in a ziplock bag and cut a tiny tip off and drizzle that way. Top each one off with a fresh raspberry and your done! Happy 4th Flag Cupcakes!

Whipped Cream mixture for the inside of the cupcakes and the topping

Tops of the cupcakes cut off, whipped cream inserted into the center of each one - yum

Layer of blueberries and cream

Replace your tops and using a large tip pipe big mounds on top

Raspberry sauce on the stove top - make sure you cool it all the way before putting it on your cupcakes

Sorry for the dark photos, it was late and my house is rather dark...

Monday, June 21, 2010

S'more Whoopies


After seeing a huge display in the grocery store for graham crackers and hershey chocolate - yum, I was in the mood for some s'mores. I guess since it's summer time the thing to do is go camping and eat s'mores. Since I can't go camping I figured I would just skip ahead to the s'more part.
I tried to think of fun ways to jazz up a normal s'more cause that would make for a pretty boring blog post. While scanning one of my favorite stores Paper Source the other day I ran across the "Whoopie Pies" cookbook - an entire cookbook on whoopie pies, why didn't I think of that?!? I was oddly drawn to the page with the s'more whoopie pie recipe... strange, I know :-)
I have made a few whoopie pies in the past, including my yummy lemon oatmeal whoopies which are great, but most of my whoopies have more of a nontraditional cookie texture rather then a cake texture. Since I hadn't tried a cake like recipe I thought it might be good to start here. These are insanely good, but I should warn you that they do take a little time, not quite as easy as baking a batch of cookies. I suggest preparing your chocolate ganache first and setting it aside while you make your whoopies and the marshmallow filling, that way you can be most efficient with your time. Also, they stick together since they are so moist which is good for taste but bad for storage. If you don't eat them all an once ;-) then place a piece of parchment in between each layer when you stack them in your storage container. I promise if you take the time to try this recipe you will not be disappointed! Give me s'more whoopies!


Start with your chocolate ganache - here is the cream right after I poured it over the chocolate chips.

This is the smooth ganache once all the cream and chocolate have melted together, yum!

Flour mixture

Sugar mixture

eggs and buttermilk

finished batter

I used a pastry bag with a extra large tip to make my circles, but use whatever you have handy, and make sure they are at least 2 inches apart so they don't bake into each other.

marshmallow cream mixture

I made sure I was organized so it wouldn't be chaos when I it came time to assemble

Graham Cracker Whoopie

Ingredients:
  • 1 1/2 c graham flour - if you can't find this then use wheat flour
  • 3/4 c all purpose flour
  • 1 1/2 tsp baking powder
  • 1/2 tsp salt
  • 4 tbsp. unsalted butter and room temperature
  • 4 tbsp vegetable shortening
  • 1 c packed dark brown sugar
  • 2 large eggs
  • 1/2 c. buttermilk
  • 2 tbsp. milk
  • 1 tsp baking soda
  • 1 tsp white vinegar
  • 1 tsp vanilla extract

Directions:
  1. Place rack in the center of the oven and prehead to 375. Line a baking sheet with parchment.
  2. In a medium bowl, stir together both flours, baking powder, and salt.
  3. In a stand mixer (if you have one) fitted with a paddle attachment, beat butter, shortening, and brown sugar until light and cream, about 3 min. Add eggs and buttermilk and beat until combined.
  4. In a measuring cup, combine milk, baking soda, and vinegar. Add this mixture slowly to the batter along with the flour mixture and beat on low speed until completely combined.
  5. Using a spoon or put your batter into a pastry bag fitted with a large round tip or even a ziplock with the tip cut off would work, drop about 1 tablespoon of batter onto your baking sheet, repeat spacing them at least 2 inches apart.
  6. Bake for about 10 min until the cakes begin to brown.
  7. Remove from the oven and let the cakes cool on the sheet for 3-5 min before transferring them to a rack to cool completely. Otherwise they are likely to break if you try and move them when they are too warm.
  8. Spread with marshmallow cream and chocolate ganache, but if you are in a hurry a dollop of marshmallow fluff and a square of chocolate would work fine also.

Makes about 40 two-inch cakes, about 20 assembled whoopie pies.

For the Marshmallow Cream!!

  • 1 1/2 c marshmallow fluff, this is about 1 full normal sized jar
  • 1 1/4 c vegetable shortening
  • 1 c confectioner's sugar
  • 1 tbsp. vanilla extract
  1. In the work bowl of a stand mixer fitter with the paddle beat together marshmallow fluff and shortening, starting on low and increasing to medium speed until the mixture is smooth and fluffy, about 3 min.
  2. Reduce mixer speed to low, add confectioner's sugar and vanilla, and beat until incorporated. Increase mixture speed to medium and beat until fluffy.

Chocolate Ganache - this is the easiest chocolate ganache ever!

  • 11 oz. semisweet or bittersweet chocolate chips
  • 3/4 cup heavy whipping cream
  1. Place your chocolate in a large, heat proof bowl.
  2. Heat the cream in a saucepan over medium heat just until in bubbles.
  3. Pour the heated cream over the chocolate in the bowl and let it sit for about 10 minutes, until the chocolate is melted. Stir with a whisk until smooth.
  4. Allow the mixture to rest until firm enough to spread, about 2 hours. Or you can refrigerate it for about 30 min until it is firm enough to spread, shirting every 10 min.


Sunday, June 13, 2010

Coco Balsamic Truffles With a Wink of Cherry


Friday night a few friends of mine were gathering to celebrate my good friend Tracy's birthday. Tracy had asked me to make something which I was happy to do since any excuse for me to bake is a good one. She picked the restaurant Trece in Dallas, so I thought the obvious dessert would be truffles - Truffles for Tracy's birthday at Trece, hah. Since we were going to a restaurant it can be tricky when someone brings dessert from outside, most places aren't so welcome to the idea and it can be a little awkward. I thought truffles were a good option since they are small and can be easily passed around the table in a box, also it is more polite to the restaurant since you aren't leaving a big mess for them to clean up and you don't need to ask for any extra plates or silverware. I made the White Chocolate Lemon Truffles along with a new recipe for Coco Balsamic Truffles with a Wink of Cherry, this way I had a dark chocolate truffle and a white chocolate truffle. They were a big hit, and everyone loved the packaging. I hope you guys like it. The original recipe was one I found from Design Sponge by Kristine Sitko, however I did adapt it a bit... I am sure her recipe as she has it is amazing as well.


Ingredients:

  • 1 13oz bag of dark chocolate chips (the best you can find)
  • 1/4 cup of heavy cream
  • 1/3 cup of Balsamic Vinegar
  • 1/2 cup of sifted powdered sugar
  • 2 1/2 tablespoons of dried cherries
  • 1/2 cup cocoa powder for dusting
Directions:
  1. Put the balsamic and cherries into a small pot and bring to a boil. Reduce heat and simmer for 5 min. Remove cherries and set balsamic aside to cool.
  2. Melt chocolate and cream in a double boiler or a heat proof glass bowl over a pot filled with water, making sure the water is hot, not boiling. Place melted chocolate in a small bowl and add the cooled balsamic (you should have about 2 1/2 tablespoons of this to add, you can add a little more depending on your preference) add in the sifted powdered sugar - mix well. Cool in the fridge for about 1 hour. let sit at room temperature for 1 hour, until firm but moldable.
  3. Roll mixture into one inch balls and place on a parchment lined tray. Pour cocoa powder into a shallow dish and rolls balls to cover. Server immediately or store in an airtight container up to one week.

Balsamic and cherries simmering in a small pot together

Adding the powdered sugar

all done, ready for the fridge

I got a round box and a square box from Michaels Craft store along with mini treat liners to hold each truffle individually... easy and affordable.

I wrote the flavors of the two different types of truffles on normal paper tags and attached them using my wax "K" stamp that I have had for years.

I had a big stack of cake liners which worked perfectly to separate the layers of truffles. I was able to do 2 layers but depending on the size of your box you might be able to fit 3. If you don't have cake liners, just cut some parchment paper and place a sheet in between each layers so they don't collapse on each other.

I used normal hemp that you can find anywhere for the wrapping, that way it stayed rustic and chic without a whole bunch of fuss. Or you can separate the flavors into brown paper bags that I also found at the craft store and sealed them with colored masking tape, very cute.

Saturday, June 5, 2010

Large Chocolate Chip Cookies

Butter and sugars before they are mixed

Dough before the chips are added (my favorite part!)

Who doesn't like chocolate chip cookie dough?

For my entire life the only chocolate chip cookie I have ever made have been from my family recipe that has been handed down. I love chocolate chip cookies probably more than any other dessert so I wanted to make some, only I'm not quite ready to release my family recipe on the internet. The chocolate chip cookies I normally make are light and fluffy, I thought I should try making something different - I chose a recipe that made more of a large crispy on the outside gooey on the inside cookie. Not to mention these are giant sized cookies so 1 is all you will need to ease that sweet tooth. They were really easy to make as most cookies are, and a huge hit.

INGREDIENTS:

2 Sticks of cold and cubed unsalted butter
1 cup sugar
1 cup light brown sugar
2 eggs
1 tsp vanilla extract
2 3/4 cup of all purpose flour
1 tsp table or fine sea salt
1 tsp baking powder
1/4 tsp baking soda
3 cups of good quality semisweet chocolate chips or chunks
you can add 1 cup of walnuts if you want

DIRECTIONS:

Preheat oven to 375
1. If you have a stand mixer use the paddle attachment. Cream together butter and sugars until well blended and fluffy. Add eggs, one at a time, mix in vanilla and beat until well incorporated.
2. In another bowl mix your dry ingredients together- flour, salt, baking soda, baking powder. Slowly add this mixture into the batter until just combined. Gently fold in the chocolate chips.
3. If you like you can weigh out the dough into 4 ounce balls, I don't have a scale so I didn't weigh mine so don't stress if you don't. Just make sure you make your cookies large, to give you an idea only 4 balls would fit on a cookie sheet at a time making sure to allow plenty of room for them to spread out when they bake. Place them on a sheep pan lined with parchment and bake for 15 min depending on how gooey and rawish you like the interior, they should be lightly browned on the edges. Make sure you don't overbake or they will be very chewy. Keep in mind that when cookies cool they harden a good bit.
5. Let cool on a rack and store in an airtight container so they don't turn to bricks.

These are best eaten right out of the oven or the day they are made. To freshen them after a fews days give them a quick turn in the microwave for 5-10 seconds. You can always make them smaller if you like, I am sure they would be just as good.

Tuesday, June 1, 2010

Watermelon Cookies


Dough ready to be made into watermelons

Ready for the oven

my decorating station


In honor of Memorial Day weekend I wanted to make something that reminded me of summer. These cookies are from my childhood, my mom used to make these for my birthday which is also in the summer so they hold happy memories for me. The recipe is from the June 1988 edition of Better Homes and Garden... yes 1988. Good news is that they still have it posted on their website, even though I prefer to use my old photocopied version from my moms magazine tear out :-)
They don't have any watermelon in them, they are meant only to look like watermelon slices. Kids love these, and so do adults since they aren't overly sweet. They are somewhere between a sugar cookie and a shortbread cookie in disguise. Great to bring to a summer party or for a kids birthday party... Enjoy!

Ingredients:

1/3 cup butter (no substitutes)
1/3 cup of shortening
3/4 cup sugar
1 1/2 tsp baking powder
1/2 tsp salt
1 egg
1 tablespoon orange juice or milk
1 tsp vanilla
2 cups of all purpose flour
red food coloring
1 egg white
1 tablespoon of water
Green coarse sugar
Miniature semisweet chocolate chips

Directions:

1. Stir together flour, baking powder, and salt in a bowl and set aside. Beat butter and shortening in a large mixing bowl with an electric mixer on medium to high speed for 30 seconds. Add sugar - beat till fluffy. Beat in egg, orange juice or milk, and vanilla until combined. Add in your food coloring (takes about 8 drops to get the red) Slowly mix in the flour mixture till combined. Divide dough in half. Cover and chill dough for 3 hours or until easy to handle.

2. Stir together egg white and water. Roll each half of dough on a floured surface until 1/4 inch thick. Cut with a floured 3-inch round cookie cutter. Cut cookies in half. place on an ungreased cookie sheet lined with parchment paper. Press a few chocolate pieces into each.Bake in a 375 degree F oven for 5 to 7 minutes or until bottoms begin to brown; do not allow to brown on top.

3. Transfer to wire racks and cool. In a small shallow bowl stir together egg white and water; brush the edge of each cookie. Sprinkle sugar on edges. dry on your wrack then transfer to your dish. Makes about 30 cookies.

Related Posts with Thumbnails