Sunday, September 4, 2011

Catfish Cake!


I know it sounds crazy but this was actually a pretty cute cake. A co-worker of mine ordered this cake for his daughters birthday. When he asked what she wanted she specifically asked for a green cake with blue frosting shaped like her favorite stuffed animal Oba the catfish. Well, I have not mastered cakes that are shaped like things so I offered up the idea of doing a mini cake for the birthday girl with cupcakes to go along with. Luckily that worked for them. I new I could pull off a small catfish made out of marshmallow fondant and a banner that said "Happy Birthday Clara Love Oba" - I made a vanilla cake with green food coloring and used a classic buttercream with blue food coloring. I also made grass/seaweed to go around the base of the cake out of fondant to make Oba feel at home :-)

Sports Themed Cake Pops


Basketballs, Baseballs, and Soccer balls! I got an order recently to make cake pops for a little boys class on his birthday and I wanted to share them with you. I think they turned out really well for never having made any sort of sports accessories before in the past. I used vanilla cake with white chocolate for the soccer and baseballs and orange for the basketballs. The trickiest part for me was the lines on the basketballs. When planning I thought I would just pipe them on with chocolate but that was nearly impossible. Then I thought I would draw them on with the edible markers but no one tells you that edible markers do not write on candy coating AT ALL! So my last idea was to use black food coloring watered down to make the stripes. I used a very small paintbrush and lightly painted the lines on. For the soccer balls I first cut out small stars in black marshmallow fondant using a star cookie cutter. I then used a sharp knife and cut off each point of the star which left me with little octagons just like a soccer ball has, I put a little melted white chocolate on the back of each one to act as glue. For the baseballs (my favorite) I just used a red frosting pen and piped out the red lines.

I will warn you - the black food coloring on the basketballs will get all over your mouth when you eat them but that is part of the fun! I went to the craft store and just got a simple white metal tin and put floral foam inside to hold up the cake pops with ease. Since I am crazy I also got some long grass from the floral section and cut it down to stick into the foam to simulate sports grass. It was the perfect stiffness to stick into the foam easily, and thanks to help from my friend Taryn we finished in no time. I really like to make the packaging fun when I am baking for a theme. I hope you enjoy the photos and try making them on your own at home...

Sunday, August 7, 2011

Dirt Cake

At my friends BBQ - I used gerber daisies, my favorite.

Sorry for the bad picture quality - this was taken with my phone on my kitchen table


This is one of my most fun desserts. When I was little my mom used to make this in the summertime when company would come over. We would eat dinner out on the back porch a lot in the summer so she would put this out as the centerpiece - not telling anyone it was actually dessert. She got a kick out of everyone faces when she would start spooning out the dirt from the pot into bowls for people to eat. To add to the fun she would use a hand trowel to scoop out the mixture. Recently I made this for my friends monkey baby shower, only I spread the mixture out into mini flower pots I purchased at ikea. I put 1-3 small daisies in each pot - really fun. I also made this for a friends BBQ and people loved it! It would make a great hostess gift if you purchased a fun flower pot and then left the pot and trowel with the hostess. Kids also love this and I can't wait to make it for my own one day. However you do it, its fun to not let anyone know that it's dessert until you are ready to serve. Keep in mind this should be eaten with a spoon in a bowl - it's not the most beautiful dessert once scooped but it tastes amazing! I apologize for not having a photo of the cake scooped out. Both times I made this in the past few weeks I was at a party and didn't have my camera ready when people dug in :-(

Ingredients:
  • 3 1/2 cup milk
  • 2 pkg vanilla instant pudding
  • 12 oz cool whip
  • 1/4 cup butter
  • 8 oz cream cheese
  • 1 cup confectioners sugar
  • 1 1/4 packages of Oreo cookies
  • Terra cotta pot
  • Hand garden trowel
  • Bouquet of flowers

Directions:
  1. In a large bowl cream together milk and vanilla pudding. Add in cool whip and mix together until just blended. Don't over mix.
  2. In another bowl cream together butter, cream cheese, and confectioners sugar.
  3. Blend both mixtures together and set aside.
  4. Using a food processor crush 1 1/4 bag of Oreo Cookies. The cream in the center will dissolve into the cookie crumb.
  5. Take your new clean terra cotta flower pot and make sure the hole on the bottom is plugged either with tinfoil or a plastic plug from a garden shop.
  6. Layer cookies with cream mixture starting with a cookie layer and ending with a cookie layer (for the dirt on top)
  7. Take your bunch of flowers cut the stems evenly and wrap the base of them in tinfoil. Place the flowers with the tinfoiled stems and put them right into the center of the pot up to the edge of the tinfoil so you can't see it. You can place more cookie mixture around the base of the flowers so not to see any foil. The mixture is thick enough to hold the flowers up.
* Refrigerate leftovers or if you make in advance refrigerate until you are ready to put it out on the table. It can be left out for about 2 hours otherwise it won't taste as good warm.
* you can also put gummy worms throughout the layers and on top for a kids party.

Tuesday, July 5, 2011

Baby Monkey Dessert Table

Whew! Finally doing another blog post with yet another baby shower dessert table. I realized it was time to sit down and post these images since the baby was born this weekend that this shower was held for. So exciting, and baby Avery is a beautiful healthy baby boy with two great parents.

Tracy (mommy) wanted a blue and brown monkey theme which I thought was great. Not only are monkeys cute they provide some great inspiration for banana themed desserts. I included the labels I made to show the full menu as well as to show the simple design. Just like the last dessert table I posted I hope to post some of the individual recipes but for now here are some images...

Color palate


labels - click to enlarge

Peanut butter chocolate layer cake

Mini Dirt Cakes

Chocolate and vanilla cake balls

Oreo stuffed chocolate chip cookies

Mini banana nut cupcakes

mini monkey breads

Supply sources:
Brown and white striped cups and blue and white polka dot cups, and blue and white striped straws: http://www.shopsweetlulu.com/
Blue and white polka dot platter: www.ikea.com
Ruffled edge platter: www.sweetandsaucysupply.com/

Wednesday, May 25, 2011

My first dessert table...


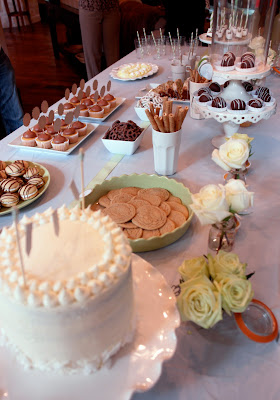
I have more images and recipes coming soon but I wanted to share this first batch with everyone. This was for my friends baby shower. They are having a little boy and they wanted green brown and white. No theme - just elegant baby...


the color palate

S'more marshmallows and white chocolate lemon truffles

Popcorn and Lemon Coconut 4 layer cake

I ordered these adorable green and white straws online to go
with Skinny Girl Margaritas to carry out the green theme

Red velvet cake balls

Lemon blueberry poppy seed bread with lemon glaze

Yellow cupcakes with chocolate cream cheese frosting

Here are some more amazing photo's from the Dad - they turned out
great and you can really see the little labels I made... thanks Aaron!


I used a little green food coloring to get a green gradient in the cake, everyone loved this


Related Posts with Thumbnails