Saturday, April 7, 2012

Lemonies


Happy Easter everyone! I was lucky enough to get out of Dallas for a night and head out to Possum Kingdom which is about 2 hours away. It was great to get out for some fresh air and no concrete. Since we still have a few weeks before the hellish Dallas summer begins everything is still green and pretty. So with the nice green drive and the fact that Easter is tomorrow I decided to make some Lemonies.

Lemonies are basically brownies and lemon squares combined. I got this recipe from Tates Bake Shop in Southampton, NY. I grew up eating Tates chocolate chip cookies - (some of the worlds best) from my Mom's store. I have since moved away and now I get the Tates newsletter each month which features a recipe from the shop. This month it was lemonies, perfect for easter or just a light sweet dessert for a girls lunch or anything else like that. I hope you guys like them...

Lemonies:
  • 1 1/2 cup all-purpose flour
  • 3/4 teaspoon salt
  • 1/4 teaspoon baking soda
  • 1 cup salted, softened butter
  • 1 cup sugar
  • 4 eggs, room temperature
  • 1/2 cup fresh lemon juice
  • Zest of one lemon

Glaze

  • 1 cup confectioner's sugar
  • 2 tablespoons fresh lemon juice
  • Zest of one lemon

Directions

Preheat oven to 350 degrees. Line a 9-inch square pan with parchment paper or wax paper. Spray sides with pan spray. Set aside.

In a small bowl, mix flour, salt and baking soda. Set aside.

Cream the butter and sugar until light and fluffy, about 3 minutes. Add eggs and mix until fully combined.

Scrape down the bowl, mix again.

Add lemon juice and zest. Mix until blended.

Add flour mixture and mix until fully blended, scraping down bowl and mixing again until batter is smooth.

Spoon batter into prepared pan and spread evenly.

Bake for 30 minutes or until firm to the touch. They will not brown.

While the lemonies are cooling, make the glaze.

In a small bowl, mix confectioner's sugar and lemon juice together. Stir in zest.

When the lemonies are cool, remove them from pan, peel off the wax paper or parchment from the bottom and turn them back over onto a cutting board.

Spread the glaze evenly over the top. Let glaze set, about 1 hour, then cut into squares.

Yield: Makes 16 squares.

Friday, March 23, 2012

K Bakes goes social


I am now on Facebook and the amazing world of Pinterest! I hope you guys all come check out my facebook page for daily inspiration and updates on what K Bakes is up to, as well as Pinterest (which I am addicted to). You can still find me on Twitter @kellynbakes and Instagram @kellynbakes.

You can follow my K Bakes Pinterest board HERE

&

You can like my Facebook page HERE

See you on the internet!

Tuesday, March 13, 2012

Strawberry Cupcakes


Just in time for spring! For some reason I associate strawberries with spring, maybe because I grew up in the North East? Down here in Texas where the seasons blend a little more, strawberries are never really not in "season." Lucky for me!

I made these for a birthday party that a client of mine was a hostess for. I had a lot of fun making the cupcakes but I might have had more fun making the monogram cupcake toppers. I used a chevron pattern in the same colors as the invitation and kept the monogram simple with a serif font rather than a script. And her monogram worked out to be ABC which I thought was very fun. These are super easy to make on your own, all you need are toothpicks, artists tape (white), scissors, and whatever your design is printed on a home printer is fine.

For the cupcakes I used a recipe from Sweetapolita - one of my favorite blogs. Her cakes are gorgeous! She has a great Strawberry frosting that goes well with this recipe on her site that I recommend checking out.

  • 1 3/4 cups sugar
  • 1 package of strawberry flavored gelatin
  • 1 cup butter, softened
  • 4 eggs (room temperature)
  • 3 cups sifted cake flour
  • 1 tablespoon baking powder
  • 3/4 teaspoon salt
  • 1 cup whole milk (room temperature)
  • 1 tablespoon vanilla extract
  • 1/4 cup strawberry puree made from frozen strawberries (puree itself should be closer to room temp, not frozen)

  1. To make the strawberry puree take your frozen strawberries and let them thaw out. I removed mine from the freezer the morning of and they were good to go by the time I got home from work. Place the thawed strawberries into a food processor and puree until smooth. Measure out 1/4 cup. You can freeze the rest to use again in the future.
  2. Preheat the oven to 350 degrees and place cupcake liners in your cupcake pan. Set aside.
  3. In a medium bowl, combine and stir the milk, strawberry puree, and the vanilla, set aside.
  4. Sift and whisk dry ingredients together in a medium bowl, set aside.
  5. In the bowl of an electric mixer fitted with the paddle attachment, cream the sugar, gelatin, and butter on medium speed until light and fluffy, about 5 min.
  6. Add the eggs, one at a time, mixing well after each one and scraping down the sides of the bowl with a spatula.
  7. Add the wet and dry ingredients to the creamed mixture by alternating - beginning and ending with dry ingredients. Don't over mix.
  8. Fill your cupcake liners 3/4 of the way full - I use a ice cream scoop to make sure they are all the same height.
  9. Bake for 20-25 min or until a toothpick comes out clean. Let them cool entirely before icing them.

Monday, February 13, 2012

K Bakes Valentines


Raspberry Cream Cupcakes

5 Minute Chocolate Mousse

Chocolate Doughnuts with Blood Orange Glaze

Red Velvet cupcakes in a jar

Blackberry Rosewater Sorbet

Mini Cheesecakes with Raspberry Hearts

Strawberry Cloud Cake

Raspberry and White Pancakes with Chocolate Peppermint syrup


Nigella Lawson Chocolate Peanut Butter Fudge Sauce


Balsamic Truffles with a wink of cherry

Since I am headed to Detroit tomorrow for work I won't be making any fun Valentine baked goods this year. I know–so tragic. Instead I thought I would do something I don't often do and write about my favorite sweetheart recipes that I have saved over the past year. I hope something tickles your fancy. You can also now follow me on Pinterest HERE to get daily inspiration for all your sweet tooth needs.

From top to bottom:

On another note, in the spirit of Valentines Day I recently read an interesting article on www.gourmetlive.com about the tradition of giving chocolate on this special day each year and I thought you all might enjoy it as well...

Our infatuation with chocolate first began 2,000 years ago when it was discovered in Latin America. The Maya and Aztec elites infused cocoa beans with water to form frothy chocolate drinks – the first frappuccinos, if you will – for special occasions and as sacrifices to the gods. The Aztec ruler Montezuma believed that chocolate was an aphrodisiac and routinely drank it before entering his harem, thus increasing chocolate’s popularity and its association with love and romance. As it turns out, he was ahead of his time. Modern-day scientists have linked the chemical phenylethylamine in chocolate to feelings of excitement, attraction and even pleasure.

The rest of Aztec society used cocoa beans as money and were unable to afford to drink it. Thus “gifting” chocolate for consumption was the Aztec version of John Cusak standing outside of your window with a boom-box. Christopher Columbus saw how the Aztecs revered cocoa when he entered the picture in the sixteenth century and immediately took the luxury product back to Queen Isabella of Spain. Chocoholics sprouted up all over Europe, sharing the legend of their new obsession’s alleged mythical powers. At one point in time, chocolate was believed to be so potent that nuns were forbidden from eating it and French doctors used it to treat “broken hearts.”

By the 1800s, the Cadbury Brothers set up shop in England and began packaging candies to sell to a mainstream audience. In 1861, in a genius marketing move, Richard Cadbury created the first ever heart-shaped box for Valentine’s Day, spurring the commercialization of the holiday. To this day, every February 14th we all still have a sweet spot for the sweet stuff.

read the full article here

Happy Valentines! xoxo-K

Monday, November 28, 2011

Blue and Orange Baby Shower


I ordered the orange and blue balloons from Sweet Shop Lulu and then had
them blown up at my local party store the day before the party.

I also ordered these straws from Shop Sweet Lulu and then found the cups at Hobby Lobby.

I am in love with the "rose" look on cupcakes.
It is super easy to do and makes each cupcake look like a flower.

These are my all time favorite fall muffins - Pumpkin Chocolate chip - YUM.

Chocolate cake with vanilla buttercream - Their was a baby elephant on the
baby shower invite so when I found this little guy at the party store I thought he
would be perfect for the top of the cake. Simple goes a long way.

Some little minis for the ladies who didn't want a whole piece of cake...

Snicker doodle shooters! The little cups are filled with cold milk, very fun for a shower.

The lovely hostesses!

I really do love baking AND creating dessert tables for people. It is a great way for me to be creative and for some reason I love the challenge of organizing the table and really bringing it all to life. This was a great example of how just a few key recipes can help make a really big statement.

I made a cake, cupcakes, muffins, cinnamon buns, and cookies - just 5 key recipes that were pretty manageable to make. I added in some candy in the theme colors and some really beautiful roses that I found that morning at the grocery store that matched the orange perfect! One bunch split into 3 jars down the back center was just enough. Then for the big statement - the balloons. I am such a believer in using these big balloons to make a big impact on a budget. I used them in the green and white baby shower I did a few months ago as well and they couldn't have been a bigger hit. Shop Sweet Lulu has the best color options I have come across.

People always ask me for advice when it comes to making a successful dessert table and I think the most important thing is time management. Always plan your recipes out in advance, make sure you can bake as many of the recipes in before the day of your party. I like to bake one thing each night starting 4 days before the event - you can freeze cake layers in advance and ice the day of, cake balls will last wonderfully in the fridge in an airtight container and most breads can be frozen before your ready to server them as well. This way the morning of your event you aren't waking up at 4am to bake. One day I will do a whole blog post on tips and tricks for dessert tables... stay tuned.

Resources:
Cupcake liners, balloons, and straws: Shop Sweet Lulu
Blue and white polka dot trays: Ikea
Orange and blue cups: Hobby Lobby
Table runner - Hostess owned
Cake stands - My personal collection from over the years.

Thursday, November 10, 2011

Beach Birthday Cake


Before I added the white chocolate shells.

All the shells set and dusted with edible glitter.

The birthday girl!

The demolished cake after they dug in.

It has been far too long since my last post so I wanted to make it a good one. This is one of the best cakes I have ever made so I am very excited to share it. It was for my Creative Director's daughter Isabelle's 14th birthday party. He and his wife wanted it to be a surprise, so they came up with a beach themed cake but also told me she liked neon colors so I did a sand colored buttercream frosting with white chocolate shells and then a basic white cake dyed in different shades of blue for the 4 layers. I love using this technique because it makes the inside of the cake really dramatic. They also told me she liked SpongeBob so I found a SpongeBob candle at the party store they added at the party as a surprise; he fit in seamlessly with the beach theme.

I used candy molds from the cake decorating store for the shells and sea horses. Once they were set I then dusted them with edible glitter to add shine and make them look even more realistic. I crushed graham cracker in the food processor for the sand and made the Happy Birthday flag in Illustrator. I prefer using the flags rather than piping the message on the cake so you can easily remove it. For the cake layers I made a classic white cake and then separated the batter into 4 bowls and dyed each one a shade of blue going from light to dark. The cake was a big hit and I am so proud of it. Hope you guys enjoy it!

Tuesday, October 4, 2011

Pinkalicious Cupcakes


I was recently asked to make cupcakes for a little girls birthday party that was Pinkalicious themed. Apparently there is this whole world of children's books that I didn't know about. There is not only Pinkalicious, but there is also Purplicious, Goldlicious, Silverlicious... all equally popular. In the Pinkalicious story a little girl eats too many pink cupcakes causing her to turn pink- The only cure is to eat vegetables! Those tricky authors :-)

The plan was to match the cupcakes in the book as closely as possible. I used chocolate cupcakes since the birthday girl herself requested they be chocolate, and a classic buttercream with pink food coloring. In the book each cupcake had a cherry on top but since regular cherries run everywhere I rolled them in sugar the night before and put them in the fridge uncovered to help dry them out a little - very sweet but very cute. A dash of pink and white sprinkles and voila! Pinkalicious cupcakes. I also dipped strawberry marshmallows in pink white chocolate and sprinkles for marshmallow pops. Jill at Stamped Paper co made the adorable crown toppers to add to the theme. I hope these ideas inspire you if you are planning a Pinkalicious party...

Going to Cabo!


Click on the template to download the larger version


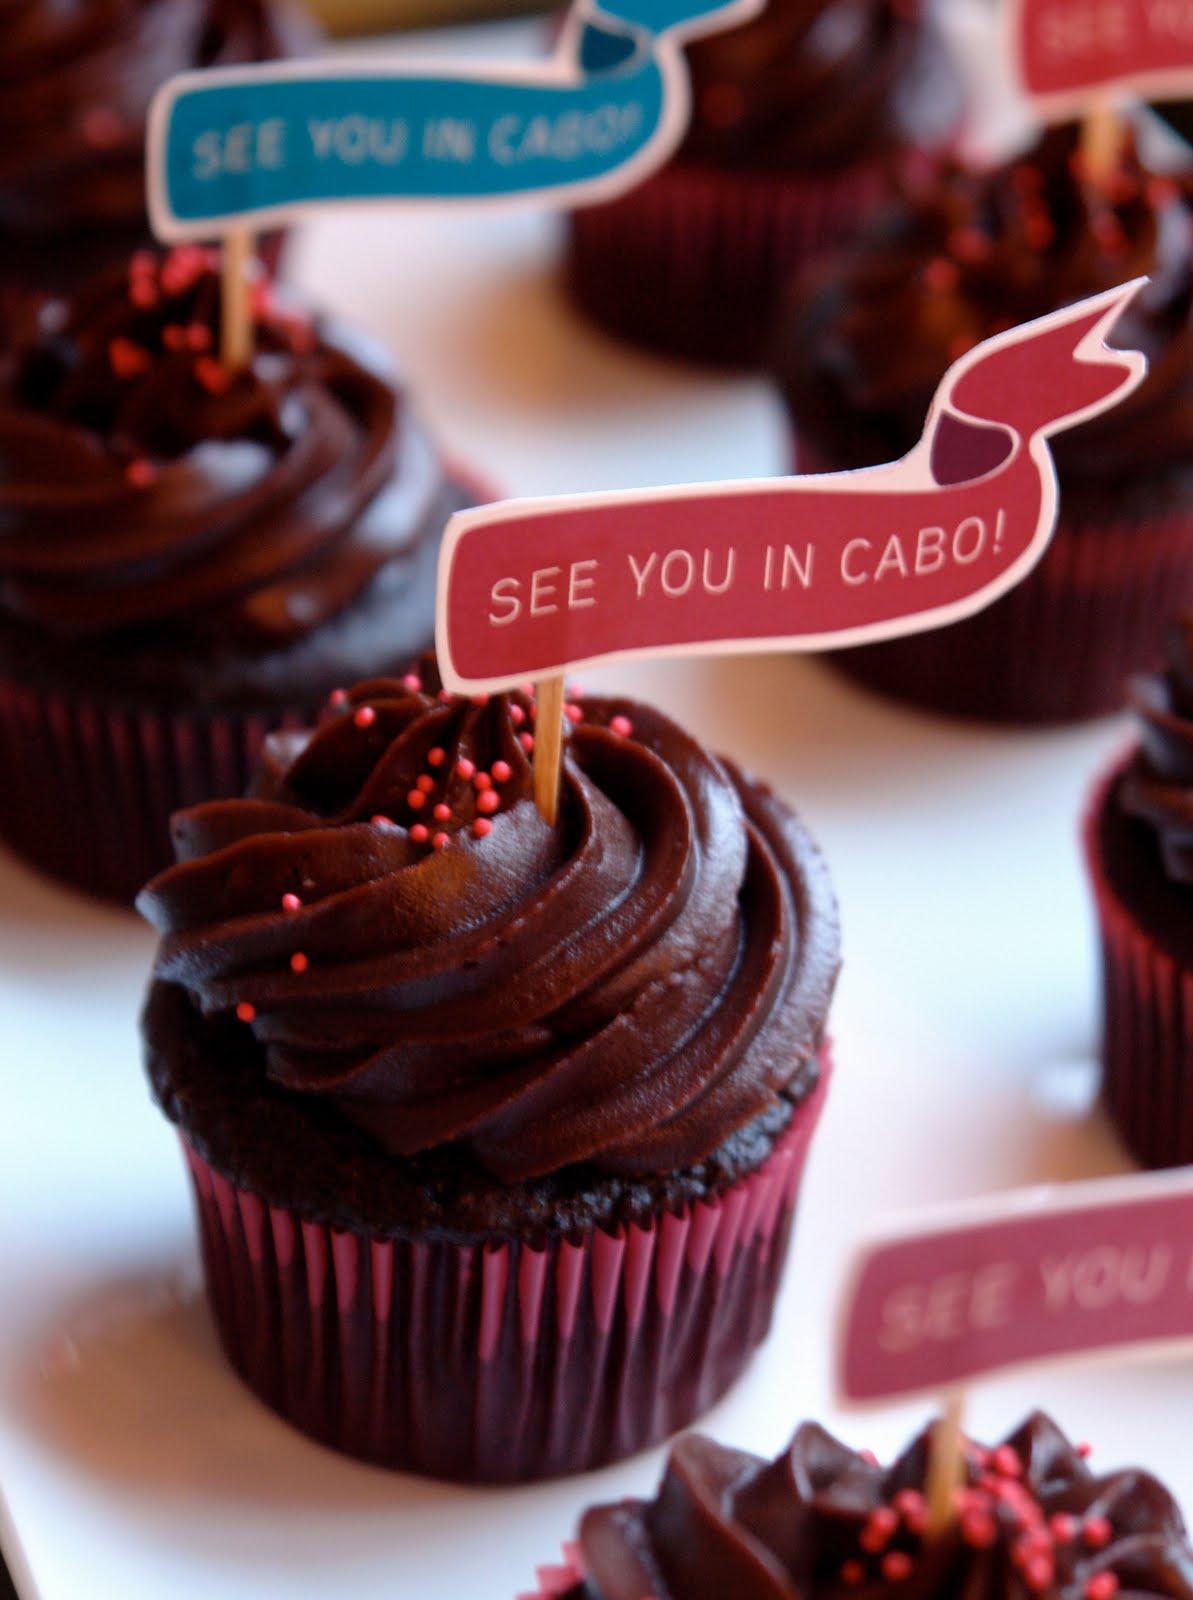
So I wish I could say that I have been waiting until the week of my friend Stephanie's wedding to post this but the truth is that I am so behind on my blogging that the fact that her wedding is this weekend is really a coincidence. With that said, I am still very excited to share these pictures and most importantly the template for the cupcake toppers I made. I made my chocolate Chambord ganache cupcakes as well as a chocolate whoopie pie with peanut butter filling (special request from the bride) for her wedding shower a few weeks ago. If you want to download the template for the cupcake toppers all you do is click on the image and then you can bring the file into photoshop or illustrator to add your own message. Or you can always just hand write on them. In this case her wedding is in Cabo, Mexico so I used the colors from her invitation designed by the talented Stamped Paper Co. and put "See you in Cabo" on the flags. Use a pair of sharp scissors and just glue a toothpick on the back to stick into the cake. Good luck!

Here is the recipe for the chocolate whoopie pie original recipe from Whoopie Pies:

  • 1 2/3 cups all-purpose flout
  • 2/3 cup unsweetened cocoa powder
  • 1 1/2 teaspoons baking soda
  • 1/2 teaspoon salt
  • 4 tablespoons stick unsalted butter at room temp
  • 4 tablespoons vegetable shortening
  • 1 cup packed dark brown sugar
  • 1 large egg
  • 1 teaspoon vanilla extract
  • 1 1/4 cup milk

  1. Preheat the oven to 375 and line baking sheets with parchment paper.
  2. Sift together the flour, cocoa powder, baking soda, and salt onto a sheet of waxed paper. In the bowl of a stand mixer fitted with the paddle attachment, beat together the butter, shortening, and browns sugar on low speed until just combined. Increase the speed to medium and beat until fluffy and smooth, about 3 minutes. Add the egg and vanilla and beat for another 2 minutes.
  3. Add half of the flour mixture and half of the milk to the batter and beat on low until just incorporated. Scrape down the sides of the bowl. Add the remaining flour mixter and milk and beat until completely combined (be careful not to over mix)
  4. Use a spoon or a pipping bag and drop about 1 tablespoon of batter onto your baking sheets and repeat, spacing them at least 2 inches apart. Bake for about 10 min each but keep on aye on them since smaller ones will cook faster.
*Let them cool completely before filling.

Related Posts with Thumbnails