Wednesday, May 25, 2011

My first dessert table...


I have more images and recipes coming soon but I wanted to share this first batch with everyone. This was for my friends baby shower. They are having a little boy and they wanted green brown and white. No theme - just elegant baby...


the color palate

S'more marshmallows and white chocolate lemon truffles

Popcorn and Lemon Coconut 4 layer cake

I ordered these adorable green and white straws online to go
with Skinny Girl Margaritas to carry out the green theme

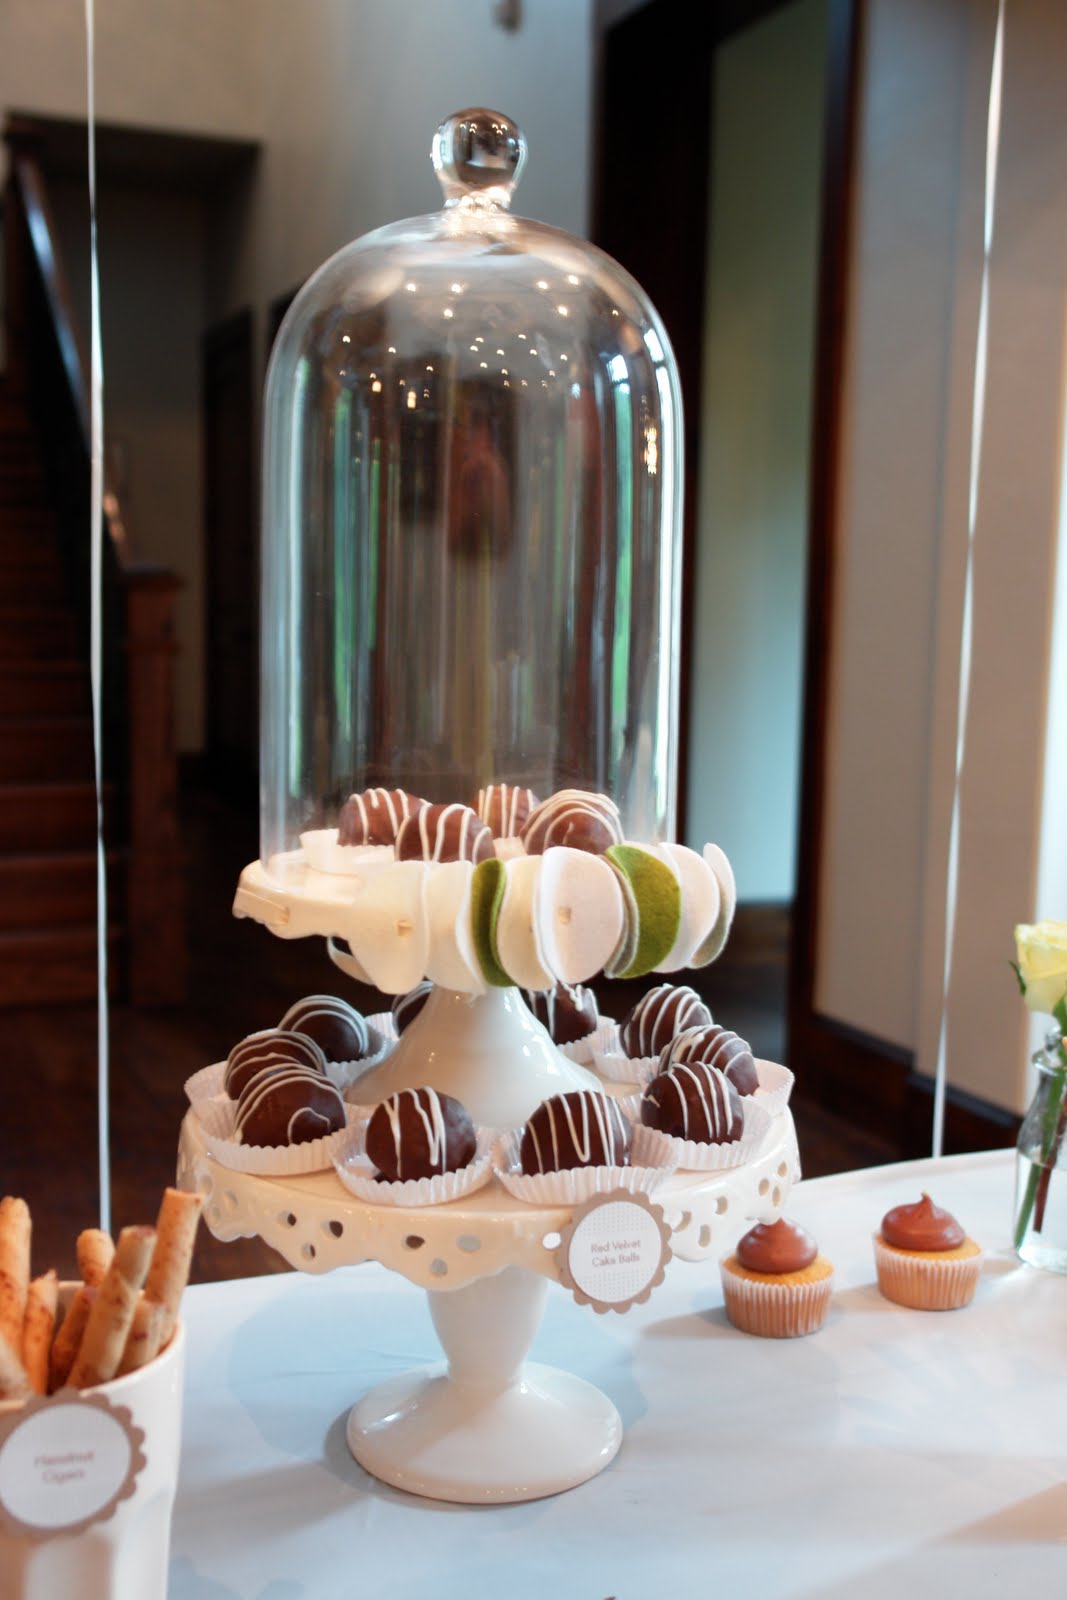
Red velvet cake balls

Lemon blueberry poppy seed bread with lemon glaze

Yellow cupcakes with chocolate cream cheese frosting

Here are some more amazing photo's from the Dad - they turned out
great and you can really see the little labels I made... thanks Aaron!


I used a little green food coloring to get a green gradient in the cake, everyone loved this


Monday, May 16, 2011

Chocolate Chambord Ganache


I have never made a frosting this easy and that tastes this good. If you like chocolate you will like this recipe, and if you like booze you will love this recipe. I have always been afraid of making a ganache icing out of fear that it would just be a runny mess when the time comes to frost the cake or cupcakes. That is not the case. After a few hours of setting up this frosting is as smooth and thick as any traditional frosting and honestly a lot easier to make. I used it on a traditional chocolate cupcake for my friend Jills birthday party but this would be equally good on a classic yellow or white cake. Enjoy!

Ingredients:
  • 18 ounces of good quality semi-sweet chocolate chips
  • 1 1/2 cups heavy cream
  • 4 tablespoons of Chambord

Directions:
  1. Place chocolate in a large heat safe bowl and set aside.
  2. In a medium saucepan, heat cream over medium heat until it just begins to boil. I don't recommend walking away from the stove during this process. Boiled cream can be a mess.
  3. Immediately pour hot cream over chocolate and let it sit for about 4-5 minutes.
  4. Begin to stir the cream with a wooden spoon or whisk starting in the center of the bowl and working your way out. As you stir, you will see the cream and chocolate come together.
  5. Let the chocolate mixture cool for about 15 min before stirring in the Chambord.
  6. Allow the ganache to cool completely and set up. On the counter it takes about 2 hours, or you can put it in the fridge for a little bit to speed up the process but watch it to make sure it doesn't get too hard.
original recipe from Bakers Royale

Wednesday, May 4, 2011

Graham Cracker Whoopie Pies with Key Lime Buttercream


It was one of the worlds best people birthday on Monday and I was so excited to bake something yummy for her. Jill is another Art Director at The Richards Group with me and along with being an amazing art director she also helps keep me sane in what can be a crazy business, and is always there when I need a friend.
I asked Jill what she wanted me to make this weekend and she had asked for a key lime pie. I was ready to oblige until the weather took a crazy turn for February in May and we were facing 45 degree temps. Key lime pie to me is a summer treat so I had to warm it up a bit. I came up with a graham cracker whoopie with key lime buttercream filling. Of course me being me, I couldn't stop there so I dipped them in chocolate once they were all assembled... its a birthday might as well go all out. These got great reviews, the birthday girl herself even said they are one of the best things I have ever baked! If you like tart + sweet combined this is your dessert. Happy Birthday Jill!

You might remember the graham cracker whoopie recipe from the S'more whoopie pies I made last year, also I have used this same glaze on the Whoopie Pies for Elvis post so check them out for some extra photos and fun recipes.


Graham Cracker Whoopie

Ingredients:
  • 1 1/2 c graham flour - if you can't find this then use wheat flour
  • 3/4 c all purpose flour
  • 1 1/2 tsp baking powder
  • 1/2 tsp salt
  • 4 tbsp. unsalted butter and room temperature
  • 4 tbsp vegetable shortening
  • 1 c packed dark brown sugar
  • 2 large eggs
  • 1/2 c. buttermilk
  • 2 tbsp. milk
  • 1 tsp baking soda
  • 1 tsp white vinegar
  • 1 tsp vanilla extract

Directions:
  1. Place rack in the center of the oven and prehead to 375. Line a baking sheet with parchment.
  2. In a medium bowl, stir together both flours, baking powder, and salt.
  3. In a stand mixer (if you have one) fitted with a paddle attachment, beat butter, shortening, and brown sugar until light and cream, about 3 min. Add eggs and buttermilk and beat until combined.
  4. In a measuring cup, combine milk, baking soda, and vinegar. Add this mixture slowly to the batter along with the flour mixture and beat on low speed until completely combined.
  5. Using a spoon or put your batter into a pastry bag fitted with a large round tip or even a ziplock with the tip cut off would work, drop about 1 tablespoon of batter onto your baking sheet, repeat spacing them at least 2 inches apart.
  6. Bake for about 10 min until the cakes begin to brown.
  7. Remove from the oven and let the cakes cool on the sheet for 3-5 min before transferring them to a rack to cool completely. Otherwise they are likely to break if you try and move them when they are too warm.
  8. Spread with marshmallow cream and chocolate ganache, but if you are in a hurry a dollop of marshmallow fluff and a square of chocolate would work fine also.

Makes about 40 two-inch cakes, about 20 assembled whoopie pies.

Key Lime Buttercream:

  • 1/2 cup butter, softened
  • 1 1/2 teaspoons Key lime zest
  • 1 teaspoon vanilla extract
  • 1/8 teaspoon salt
  • 1 (16 oz) package powdered sugar
  • 3 tablespoons key lime juice
  • 1 - 2 tsp heavy whipping cream or milk
  1. Beat the first 4 ingredients at a medium speed in a stand mixer fitted with the paddle attachment until creamy.
  2. Gradually add powdered sugar alternately with key lime juice. 1 tbsp at a time. and 1 tbsp of milk, beating at low speed until blended and smooth after each addition. beat in up to 1 tbsp of additional milk for desired consistency.
Makes about 2 3/4 cups of buttercream. I would recommend doubling if you are using this for a cake.

Chocolate glaze:
  • 1 1/2 cups semisweet chocolate chips
  • 1 cup heavy whipping cream
  • 1 tablespoon unsalted butter at room temperature
Put the chocolate in a heatproof bowl. Heat the cream in a small, heavy saucepan over medium heat just until it bubbles. Pour the hot cream over the chocolate in the bowl and stir until smooth. add the butter and stir to blend.

Wednesday, April 27, 2011

Inspiration: Pink Rainbow Cake

I just came across this amazing cake and I had to share it right away. I can't wait to make one myself but in the mean time lets all be in awe of Call Me Cupcake's beautiful cake:


Monday, April 4, 2011

Cinnamon Cream Cheese Frosting


Red velvet with cinnamon cream cheese frosting

The party was AARP themed since the birthday girl was turning 50... she took it like a champ!

Chocolate with peanut butter buttercream and chocolate peanut butter sauce


One of my favorite co-workers commissioned me to make 50 cupcakes for another awesome co-worker of ours and of course I was super excited. After talking it over we settled on three flavors:
  1. Chocolate with peanut butter buttercream and peanut butter chocolate fudge sauce
  2. Classic yellow cake with dark chocolate cream cheese frosting
  3. Red velvet with cinnamon cream cheese frosting and red velvet crumb topping
I had made all of the icing and cakes on their own and some together over the past few years but I had never used the cinnamon cream cheese frosting in the past and it was so good that I had to share it with you all. This is crazy simple, and really nothing fancy but it ads a whole new delicious layer to a red velvet cake. It's so subtle that you can't really pinpoint what it is but when you do it is such a surprise that it makes everyone smile. Try it on you next red velvet cupcake and I promise you wont be disappointed.

-K

Ingredients:
  • 4 cups powdered sugar sifted
  • 1/2 cup butter, room temp
  • 8 oz cream cheese
  • 1/2 tsp vanilla extract
  • 1/2 tsp ground cinnamon (you can also use nutmeg)
  • 1 tbl heavy whipping cream (this is optional but I find it helps the frosting to be extra fluffy)
  1. Cream the butter in a stand mixer fitted with the paddle attachment. Slowly add the powdered sugar, cinnamon, and heavy cream mix until well combined.
  2. Add the cream cheese and beat on high for about 5 min or until the frosting is light and fluffy. Try not to over-beat.

Saturday, April 2, 2011

Chocolate Rice Krispie Treats


These are one of my most favorite treats of all time, they are like chocolate crack. My mom has been making these since I was a little girl, the only thing is that I can only remember her making them at Christmas. Almost everyone has heard of marshmallow rice krispy treats but almost no one has heard of or had a chocolate rice krispy treat. Come to think of it, I have never seen these for sale at any supermarket or bakery... that makes them even more special.
My mom and I made these this year at Christmas so I included some pictures of how she traditionally decorates them. Super easy - grocery store bought icing tubes in green and red with a little leaf tip on the green and voila! You have holly! I couldn't resist and wanted to make them for St. Patricks day this year only instead of holly I made little clovers on top with store bought vanilla icing that I died green. Just as cute, and just as fun to eat. If you like chocolate you will love these. Enjoy...

Ingredients:
  • 11 1/2 oz package (2 cups) Milk chocolate morsels
  • 1/2 cup butter
  • 1/2 cup light corn syrup
  • 2 tsp. vanilla extract
  • 1 cup sifted confectioners sugar
  • 4 cups kellogs rice krispies
Directions:

Combine milk chocolate morsels, butter and corn syrup in a medium sized saucepan. Stir over low heat until melted and smooth. Remove from heat - stir in vanilla extract and sugar. Add the rice krispies mixing carefully until well coated. Spread evenly in a 13x9x2 pan and chill until firm, best overnight.


Sunday, March 6, 2011

Oreo Stuffed Chocolate Chip Cookies


Cookies are my favorite, and chocolate chip cookies are my ultimate favorite. Seriously, you can ask most anyone I know that I will always opt for a chocolate chip cookie over any other when given a choice. I'm not sure what it is about them that make them so good, is it the cookie part or the chocolate chip part? I think it must be a combination of the both, with that said I couldn't think of a better way to add to that amazing combination than to add one of America's favorite cookies - the Oreo. Oreo's are by far the best cookie to dip in milk. (It is a mandatory to eat these cookies with a tall glass of cold milk) I came across this recipe after once again reading one of my favorite blogs Lovin from the Oven. This is a cookie within a cookie, or maybe I should call them 3 cookies in one cookie. Super easy, and sooo good. Enjoy!

Recipe adapted from Lovin from the Oven.
  • 2 sticks of softened butter
  • 3/4 cup packed brown sugar
  • 1 cup white sugar
  • 2 large eggs
  • 1 tablespoon vanilla extract
  • 3 cups all-purpose flour
  • 1 teaspoon salt
  • 1 teaspoon baking soda
  • 10 oz semi-sweet chocolate chips
  • 1 package Oreo cookies
  1. Cream together the butter and sugars. Add in the eggs and vanilla and mix until well combined.
  2. In a separate bowl, mix the flour,baking soda, and salt.
  3. Slowly add the dry mix tothe we mixture until just combined. Stir in the chocolate chips.
  4. Wrap the dough in plastic wrap and place in the fridge for at least an hour to rest.
  5. Preheat the oven to 350 degrees.
  6. Scoop a ball of cookie dough on top of the Orean and another below, sandwiching the Oreo in between. Flatten the cookie dough and seal the edges, completely covering the Oreo.
  7. Place the cookies at least 2 inches apart on a baking sheet covered in parchment. Bake for 8-13 minutes.

Related Posts with Thumbnails