Thursday, May 27, 2010

Brownies for Julia


Melt the chocolate and butter over a double boiler

Until smooth and glossy like this

Mixture of eggs and sugar - put half of this in the melted chocolate and whip the other half for 3 min

almost done...
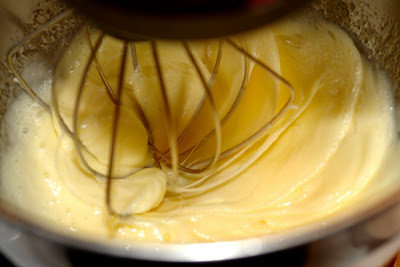
Perfect- light fluffy and double their size

Egg mixture and chocolate

Slowly fold in eggs to the chocolate

Once egg mixture is almost mixed in slowly add the flour and salt mixture - folding gently

Pour into the pan and sprinkle with extra chocolate chips if you like


I have never made brownies from scratch before... I know, it's sad. So I decided to try and master a recipe that I had found on another blog ... I bet you are wondering who Julia is? It is actually Julia Child, here is the story:

Dorie writes “In 1995, when I was working with Julia Child filming the PBS series Baking with Julia and writing the companion book, Boston-based pastry chef Rick Katz was running the prep kitchen in Julia’s basement. Working between the washing machine and the dryer, Rick was in charge of getting the recipes of each of the twenty-six visiting chefs ready for their close-ups. An ordinary human would have had his hands full, but superman Rick always found time to make us extra little goodies, among them these very dark, very fudgy brownies. The way he prepares the batter is different from any other brownie recipe I know. Half of the eggs and sugar are mixed in with the chocolate, while the other half are beaten until they double in volume and are as light as a sponge. Whipping the eggs creates the surprisingly creamy, soft and definitely fudgy texture."

So that was it, I had to try them. I like recipes that elevate classics to a new level. This is one of those recipes. These brownies are pretty much amazing and taste different then most brownies - almost lighter but still amazingly chocolatey!

INGREDIENTS:

  • 1 c. all-purpose flour
  • 1 tsp salt
  • 2 sticks of unsalted butter, cut into pieces
  • 1/2 cup of bittersweet 60% cocoa chocolate chips
  • 1/4 cup of semi-sweet chocolate chips (I used another 1/2 cup here since I prefer a stronger chocolate taste)
  • 2 cups of sugar
  • 1 tsp pure vanilla extract
  • 4 large eggs
  • Powdered sugar for dusting
Step by step:
  1. Preheat your oven to 350 with the rack centered.
  2. In a small bowl whisk the flour and salt together - put aside
  3. Create a double boiler - bring some water to a boil in a pot and place a heatproof bowl over the top. Add the chocolate and butter. Stir frequently until the butter and chocolate are just melted - you don't want them to get so hot that the butter separates.
  4. Add 1 cup of the sugar to the chocolate mixture and whisk gently just to incorporate it then remove the bowl from the pan of water. Stir in the vanilla.
  5. In another bowl or a stand mixer put the other cup of sugar in with the eggs - mix with the whisk attachment until just incorporated and transfer HALF this mixture to the bowl with the chocolate. Whisk in gently until just incorporated.
  6. Whisk the remaining egg and sugar mixture for 3 min on high speed or until the are double in volume. Using a spatula and a very light touch fold the whipped eggs into the chocolate, stopping just short of blending them in completely.
  7. Sprinkle the dry ingredients over the batter and delicately fold them in, working only until they disappear. Scrape the batter into a 9 inch brownie pan (I use pyrex and spray with Pam Baking Butter spray)
  8. This part is optional- you can throw a few extra semi-sweet chocolate chips on top if you want
  9. Bake for 25-28 min, or until the top looks dry. Poke a knife in the center and take a peek; the brownies should be only just set and still pretty gooey.
  10. Cool the brownies completely and sprinkle with powdered sugar for extra fun. These brownies are pretty fragile so be careful when removing them from the pan.

Enjoy!

Tuesday, May 18, 2010

White Chocolate Lemon Truffles

Chocolate, butter, and cream melting over the double boiler

Chocolate, butter and cream completely melted and beautiful!

Here is the mixture after 2 hours of chilling in the fridge... should be hard

Rolling...

A friend of mine was having her second annual "white party"last weekend and asked me to make something small and sweet to bring along. After searching high and low for a recipe I decided to try making truffles. First problem was that I have never made truffles before, second was that truffles are normally brown... not ideal for a white party. I came across a recipe for white chocolate truffles which sounded perfect. Once I began researching deeper I decided I couldn't leave it at just white chocolate, I needed something else, so I decided to make white chocolate LEMON truffles! By now you can probably tell I like lemon in my desserts - I find lemon flavor to be great in the summer and it helps cut some of the sweetness in a overly sweet recipe.
At first I was so excited to make my first batch of truffles, then I was instantly scared since I had never made them before and didn't know how simple or how hard they could be. Don't worry!!! these are very simple! I figured it would be best to start slow, now that I have mastered these let the truffle testing begin! They were a huge hit at the party, one of my friends even wrapped a few extra in a paper towel and put them in his pocket for later... hah. Hope you guys like them.

INGREDIENTS:

1 cup of white chocolate - I use Ghirardelli white chips which are easy to find in the baking isle of the grocery store.
5 Tbsp. unsalted butter - If you use salted don't add any extra salt in the end, they will be way to salty.
3 Tbsp. heavy cream
Pinch of salt
1 tsp. Lemon extract
Powdered sugar, for rolling/dusting
1 lemon for zesting if you like

1. Bring a pot of water to a boil on the stove top.
2. Melt the chocolate, butter and cream over the double boiler while stirring (make sure you use a glass bowl over the double boiler) I recommend staying by the mixture during this process so you can be sure it won't burn.
3. Once melted you can remove from the heat and stir in the salt and extract.
4. Allow to cool a bit before covering it with plastic wrap, refrigerate for at least 2 hours, overnight works fine as well.
5. With a mellon baller or if you don't have one you can always use a spoon scoop out the mixture and form into balls (they don't have to be perfect) this can be a bit messy since the chocolate will start to melt and stick to your hands. Roll the balls in the powdered sugar and set a cookie sheet. Once your done you can put them in a cute bowl for presentation and zest some lemon over the top so everyone will know they have lemon flavor in them.
6. Store these covered in the fridge for up to a week or you can store these in the freezer for longer storage.

Recipe makes about 24 truffles

Friday, May 14, 2010

The Paris Market and Brocante - Savannah, GA


As some of you know, I went to college at the Savannah College of Art and Design or more commonly known as SCAD. I recently went back for a visit and went to my favorite store in the world which also happens to be where I earned a paycheck through college :-) - The Paris Market & Brocante.
Owners Paula and Taras Danyluk have taken a world of travel, design, and food and put it all together in one amazing store in the heart of Savannah. They travel the world and bring back their treasures for all of us to ogle at. It is a two story masterpiece full of anything you could possible want. I couldn't describe to you the feeling you get when you walk in the doors since it changes on a regular basis and since it's so overwhelming in a good way that its too good to put into words. The Patisserie is on the first floor where you can enjoy anything from a latte to lavender infused water, and of course fresh cookies, cupcakes, or even old fashion marshmallows from France. Downstairs is a brick dungeon of sorts, with old brick archways and corners full of old world finds, Paula recently purchased a photographers collection of old prints and cameras which is featured on a long dining room table that one could search through for days. She also has a new Baby line which is to die for cute. If you are in Savannah you would be crazy not to stop in, I can promise you that you won't be disappointed!

Here are some of my photos of the Patisserie...

Here are some photos of the rest of the store along with the new photo and antique camera collection:

Tuesday, May 4, 2010

Banana Nut Mini's


My friend Jill's birthday was this weekend and she was having a "Mini" food theme so after planning on baking mini apple cider donuts my plan was foiled at around 9:30pm on Friday night when I realized I didn't have any plain yogurt which the donut recipe calls for. So, I looked around at my options and all I had were some bananas, nuts, and some yellow cake mix... so banana cupcakes were on the menu.

This recipe is super easy and these mini cupcakes are by far some of the most moist cupcakes you will ever taste. You could also make regular size cupcakes with this recipe if you want... they are great with coffee.

BATTER:
  • 1 pkg of Duncan Hines yellow cake mix
  • 1 cup of water
  • 1/3 cup Vegetable oil
  • 3 large eggs
  • 2-3 Bananas
  • 1 cup of walnuts
BUTTERCREAM FROSTING:
  • 1/2 shortening
  • 4 cups of sifted powdered sugar
  • 1 tsp vanilla extract
  • 1/2 cup butter
  • 2 tablespoons of whole milk
To make the cupcakes:

Preheat the oven to 350F fill your pan with mini cupcake liners set aside. Blend dry mix, water, oil, and eggs in a large bowl at low speed until moistened. Beat at medium speed for 2 min. In another bowl mash your bananas with a fork, add into the batter, mixing with a spoon. Put your walnuts in a food processor and grind until you have small little bits of the nuts, add to batter. Thats it for the batter- it is super easy.

Fill your mini cups 3/4 of the way up with the batter. Bake in the oven for about 12-15 min. They are very moist so they take a bit more time then most mini cupcakes to bake. Let them cool completely before adding the frosting.

To make the icing:

Mix the shortening and butter until fluffy, add in vanilla extract. Once combined slowly add in the powdered sugar while mixing. The mixture will be rather dry at this point. Slowly add in the milk until you reach your desired texture. Keep in the fridge until you are ready to use.

Related Posts with Thumbnails